If you own a Shopify store and have the basic knowledge about marketing, ads, or just, tracking, you might already know about Google Tag Manager. The name makes it sound more complex than it is. But really, once you “get” what it does, you wonder how you ever worked without it.
With GTM, you don’t have to mess around with editing a dozen tracking codes every time you add something new, Google Ads, Meta Pixel, analytics events, remarketing tags, you name it. Instead, you get one spot to manage everything.
And let’s be real, by now, if you’re running a serious Shopify store, you’re probably already on board with GTM or you might have a team of expert Shopify Developers.
What Is Google Tag Manager?
Google Tag Manager (GTM) is a free Tag Management System (TMS). It lets you set up and manage tags on your website or app without dealing with the code. Instead of adding multiple tracking codes into your Shopify theme files by hand, you install the Google Tag Manager once. After that, you manage most tracking from inside the GTM dashboard itself.
That means:
- easier analytics setup
- cleaner tracking management
- fewer theme edits
- less chance of accidentally breaking your store
It’s especially useful when your store starts using:
- Meta ads
- Google Ads
- TikTok Pixel
- conversion tracking
- custom analytics events
Without Google Tag Manager, tracking quickly becomes messy.
Why Shopify Merchants Use GTM
There are a few reasons Google Tag Manager has become almost standard for e-commerce stores.
Easier Tracking Management
You don’t need to edit code every time marketing changes something.
Want to add a new pixel?
Do it in GTM.
Need conversion tracking?
GTM handles it.
Better Marketing Data
Ad platforms rely heavily on event tracking now.
Without proper tracking:
- ROAS becomes inaccurate
- Conversions get missed
- remarketing breaks
- Campaign optimization suffers
Good tracking directly affects ad performance.
Cleaner Theme Files
Random scripts scattered across the theme. Liquid files become a nightmare later.
Google Tag Manager keeps things organized.
Before You Start
You’ll need:
- A Shopify store
- A Google account
- A Google Tag Manager account
- Basic admin access to Shopify
If you don’t already have a GTM account, create one first through Google Tag Manager Official Website
Step 1: Create a Google Tag Manager Container
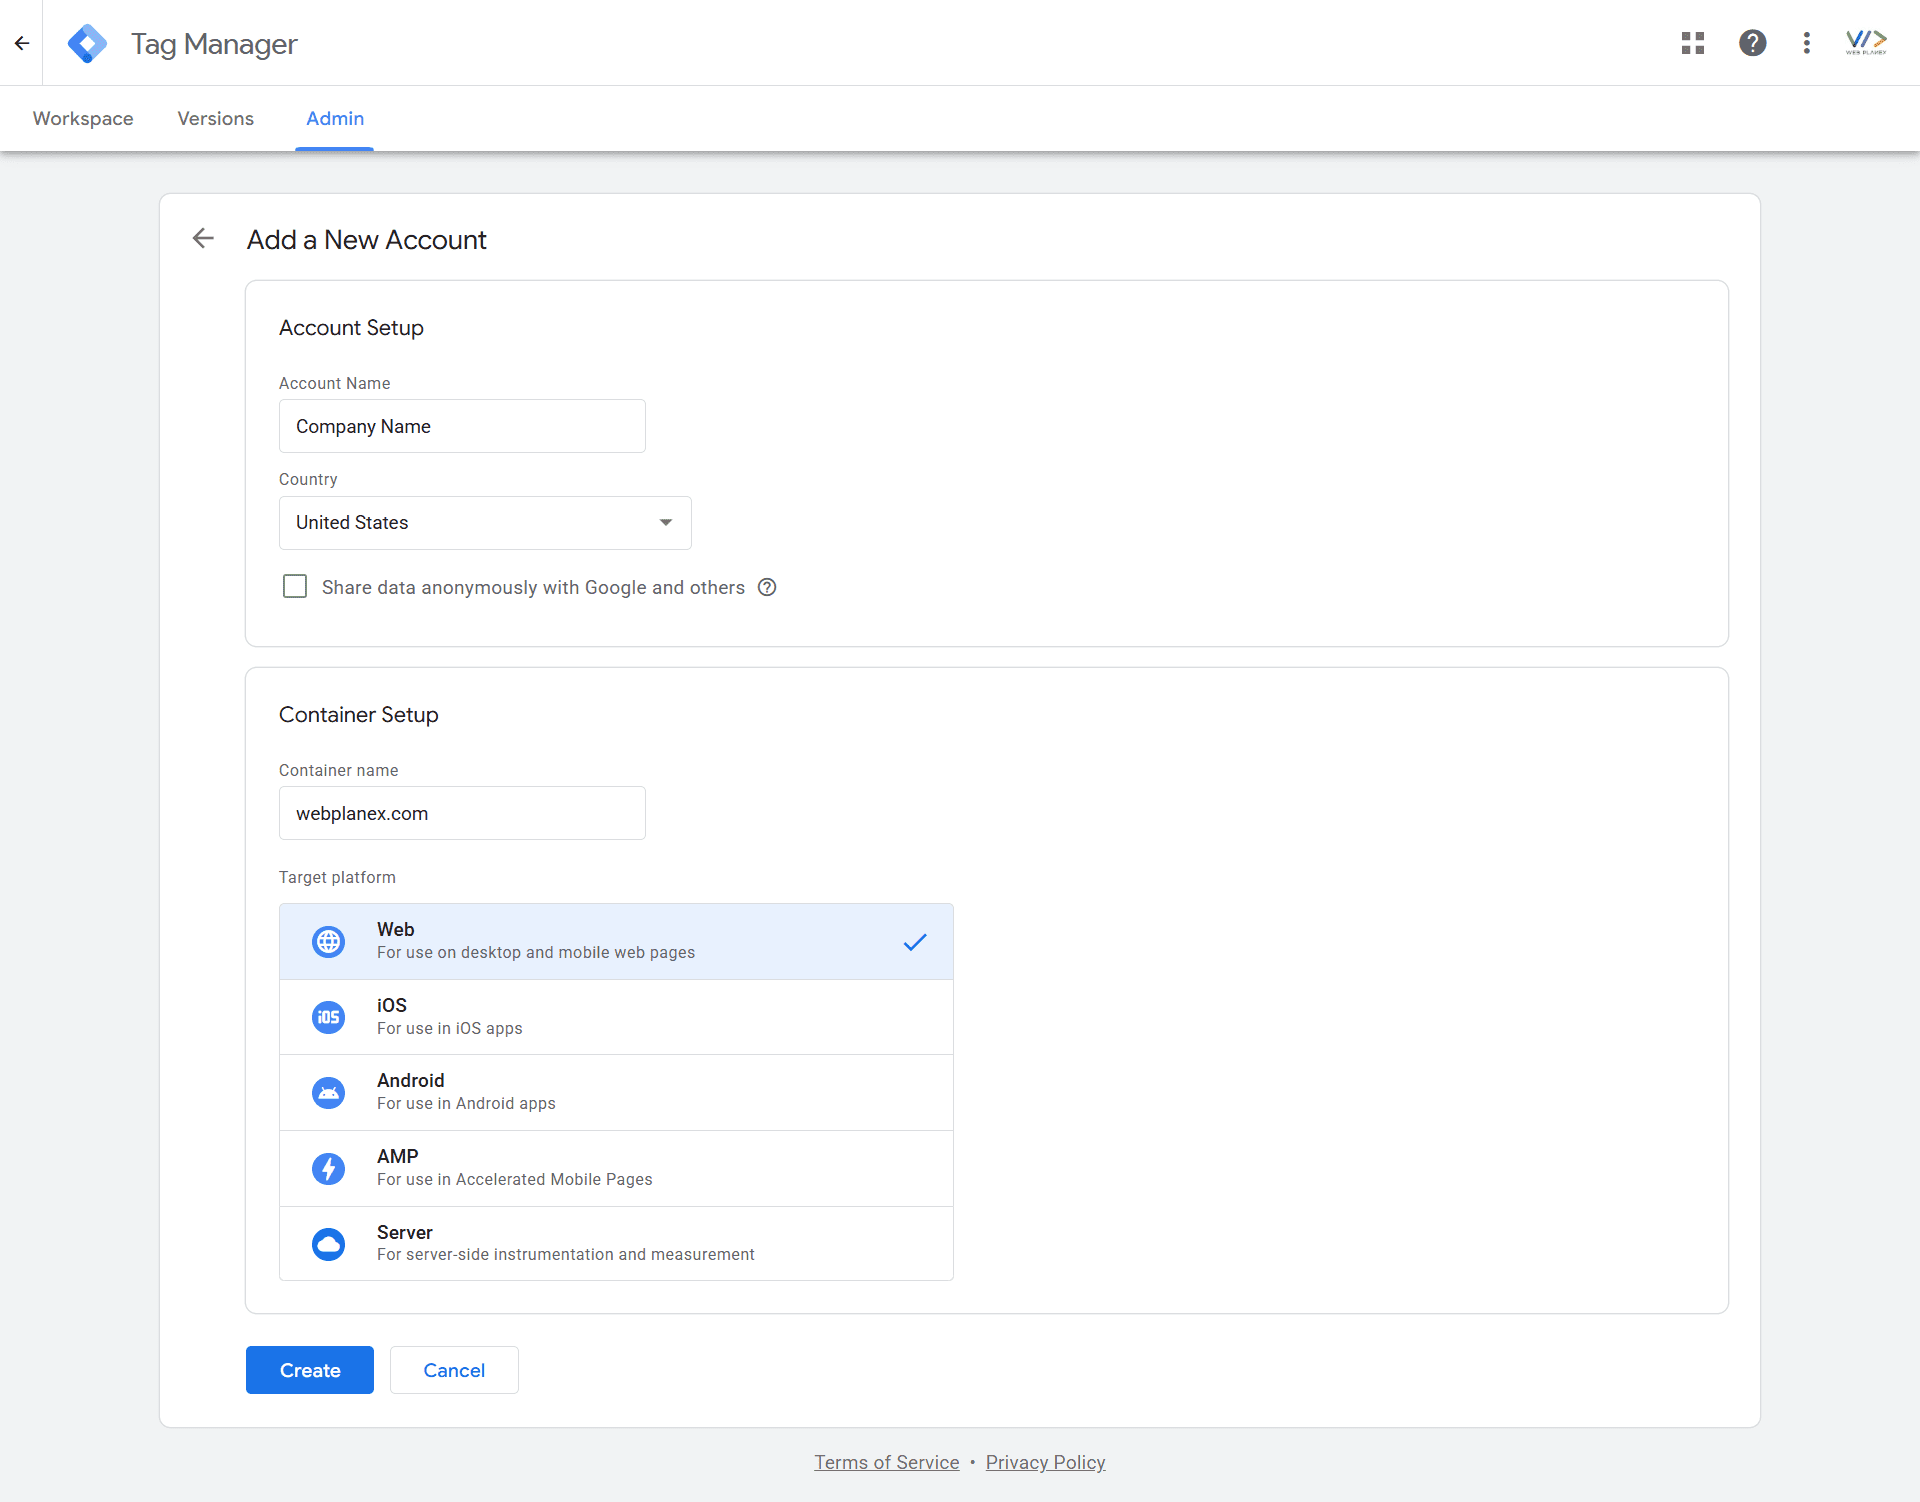
Inside GTM:
- Click Create Account
- Add your business/store name
- Choose your country
- Select Web as the target platform
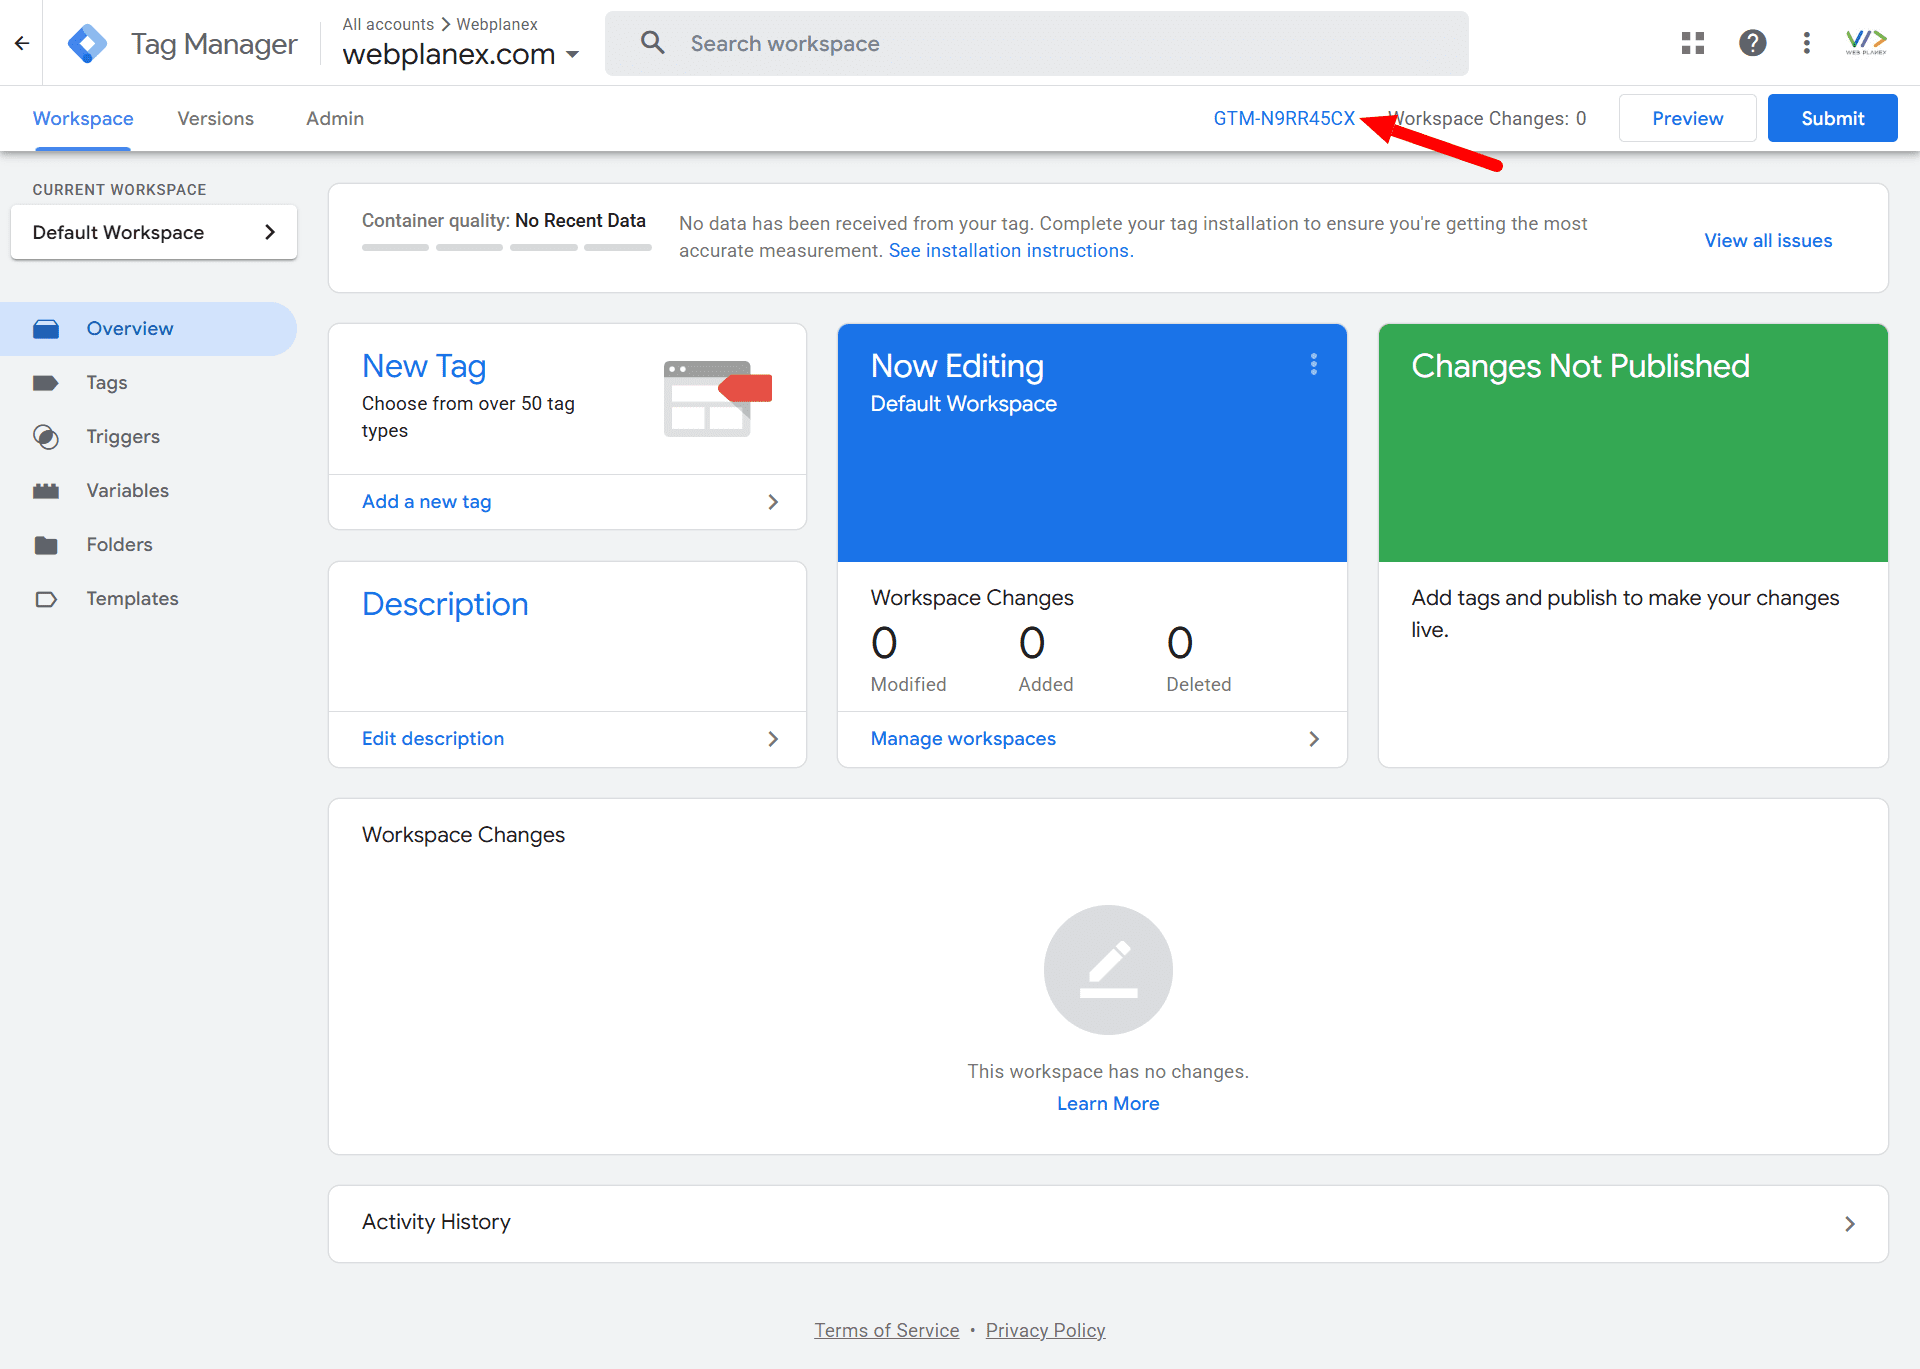
Google will then generate:
- a Google Tag Manager ID
- two code snippets
You’ll use these inside Shopify.
The ID usually looks something like:
GTM-XXXXXXX
Step 2: Copy the GTM Code
Google gives two separate snippets.
One goes inside the <head> section.
The second goes inside the <body>.
Don’t worry if that sounds technical, Shopify makes this easier than it sounds.
Step 3: Open Your Shopify Theme
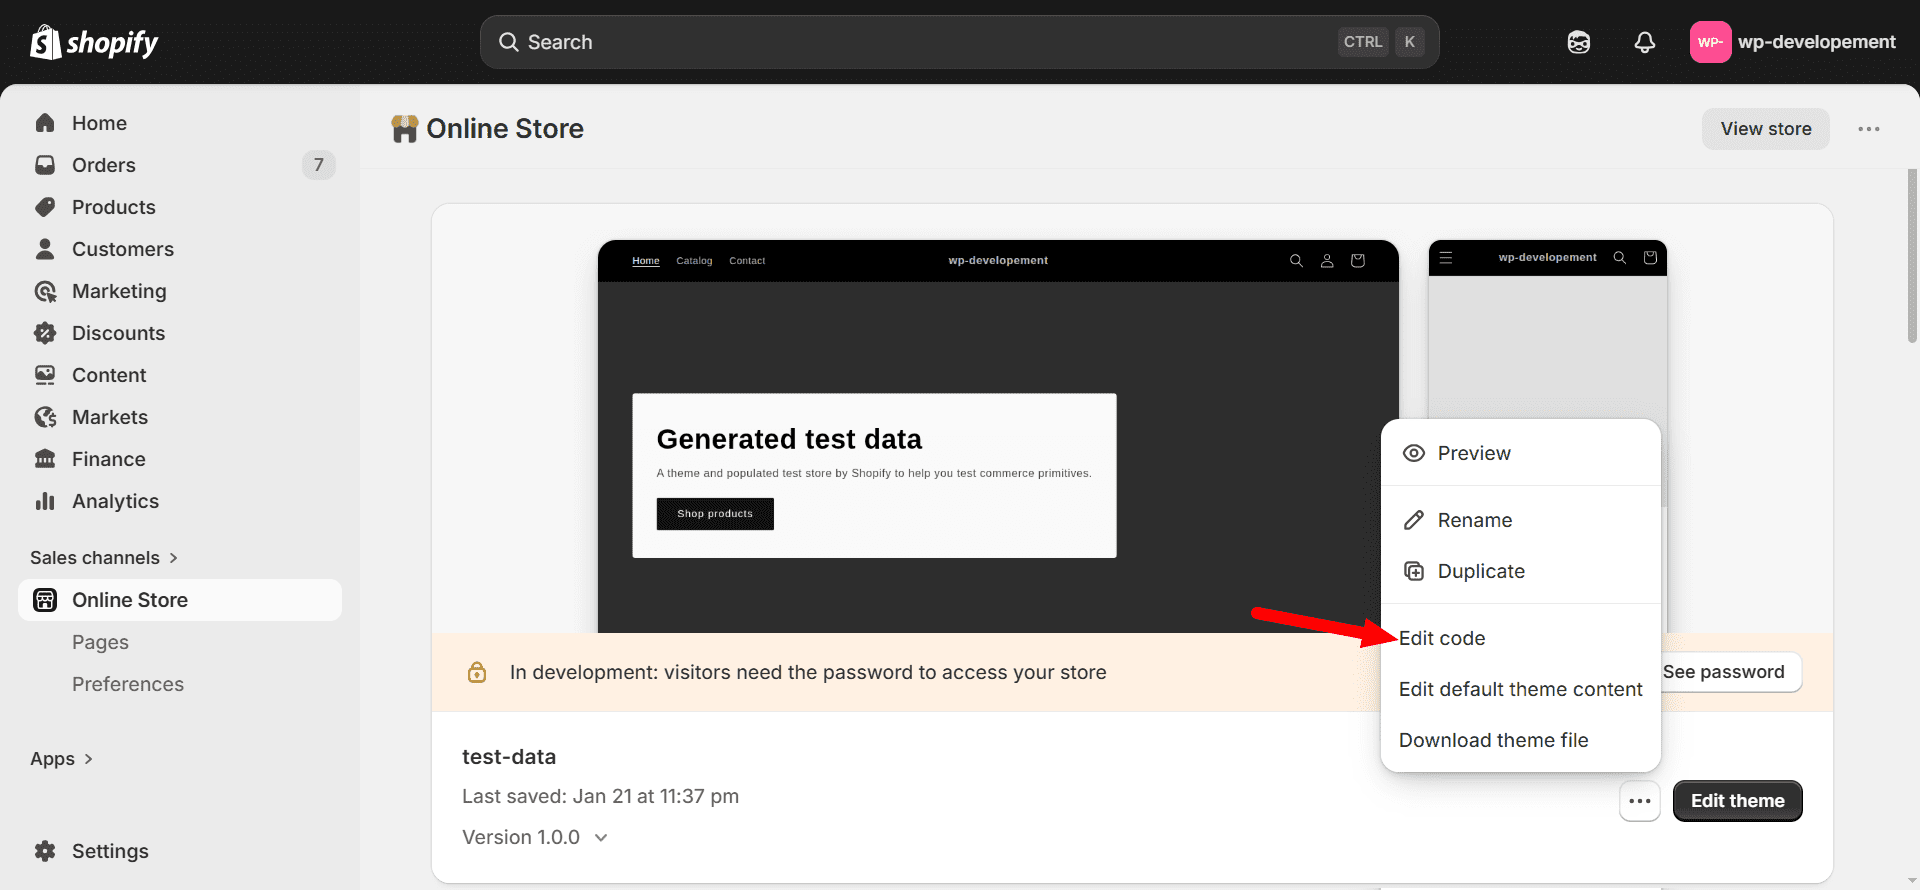
Inside Shopify:
- Go to Online Store
- Click Themes
- Find your active theme
- Click Edit Code
Now locate the:
theme.liquid file
This file controls the overall layout structure of your store.
Step 4: Add the First GTM Snippet
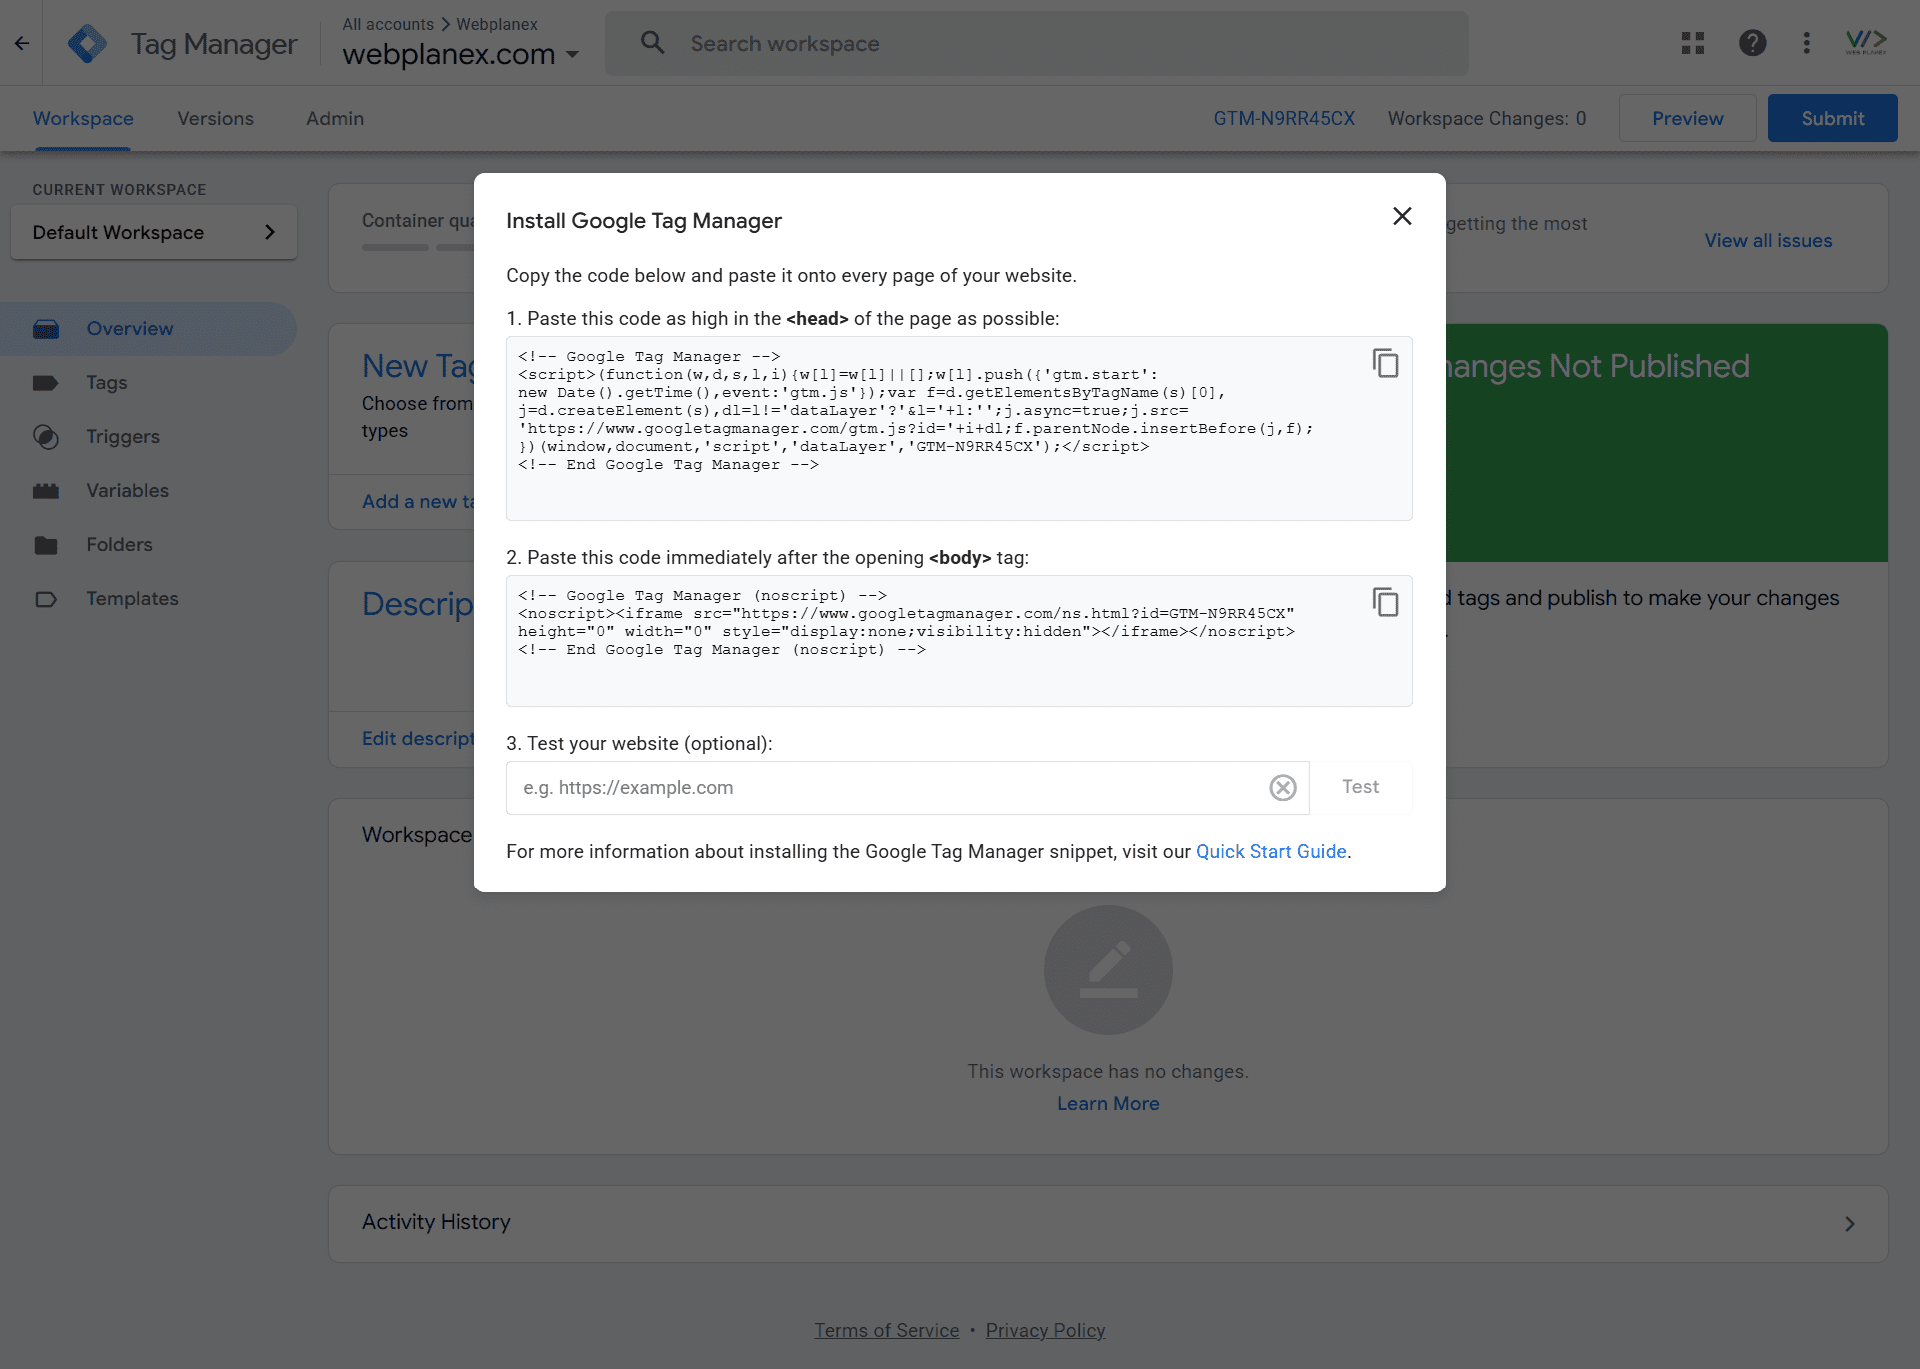
Paste the first GTM code immediately after:
<head>

Not somewhere random, lower in the file.
Right below the opening head tag is safest.
Save the file.
Step 5: Add the Second GTM Snippet
Now locate:
<body>
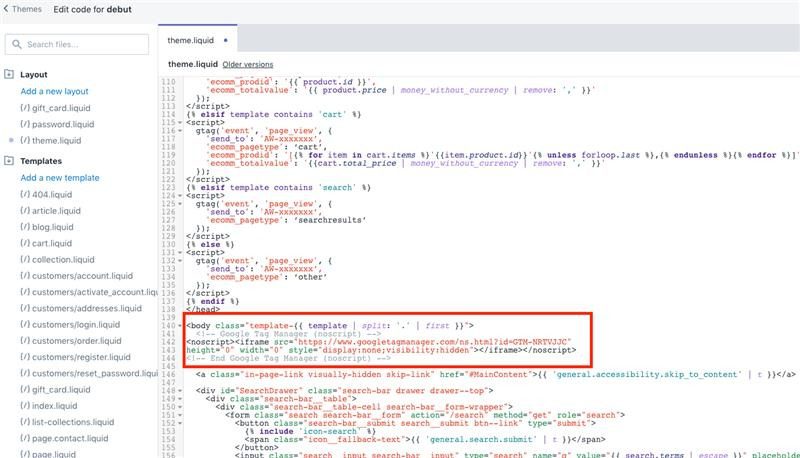
Paste the second GTM snippet immediately below it.
Save again.
That’s the core installation done.
Step 6: Verify the Installation
Open your store in a browser.
Then install the:
- Google Tag Assistant extension
OR - GTM Preview Mode
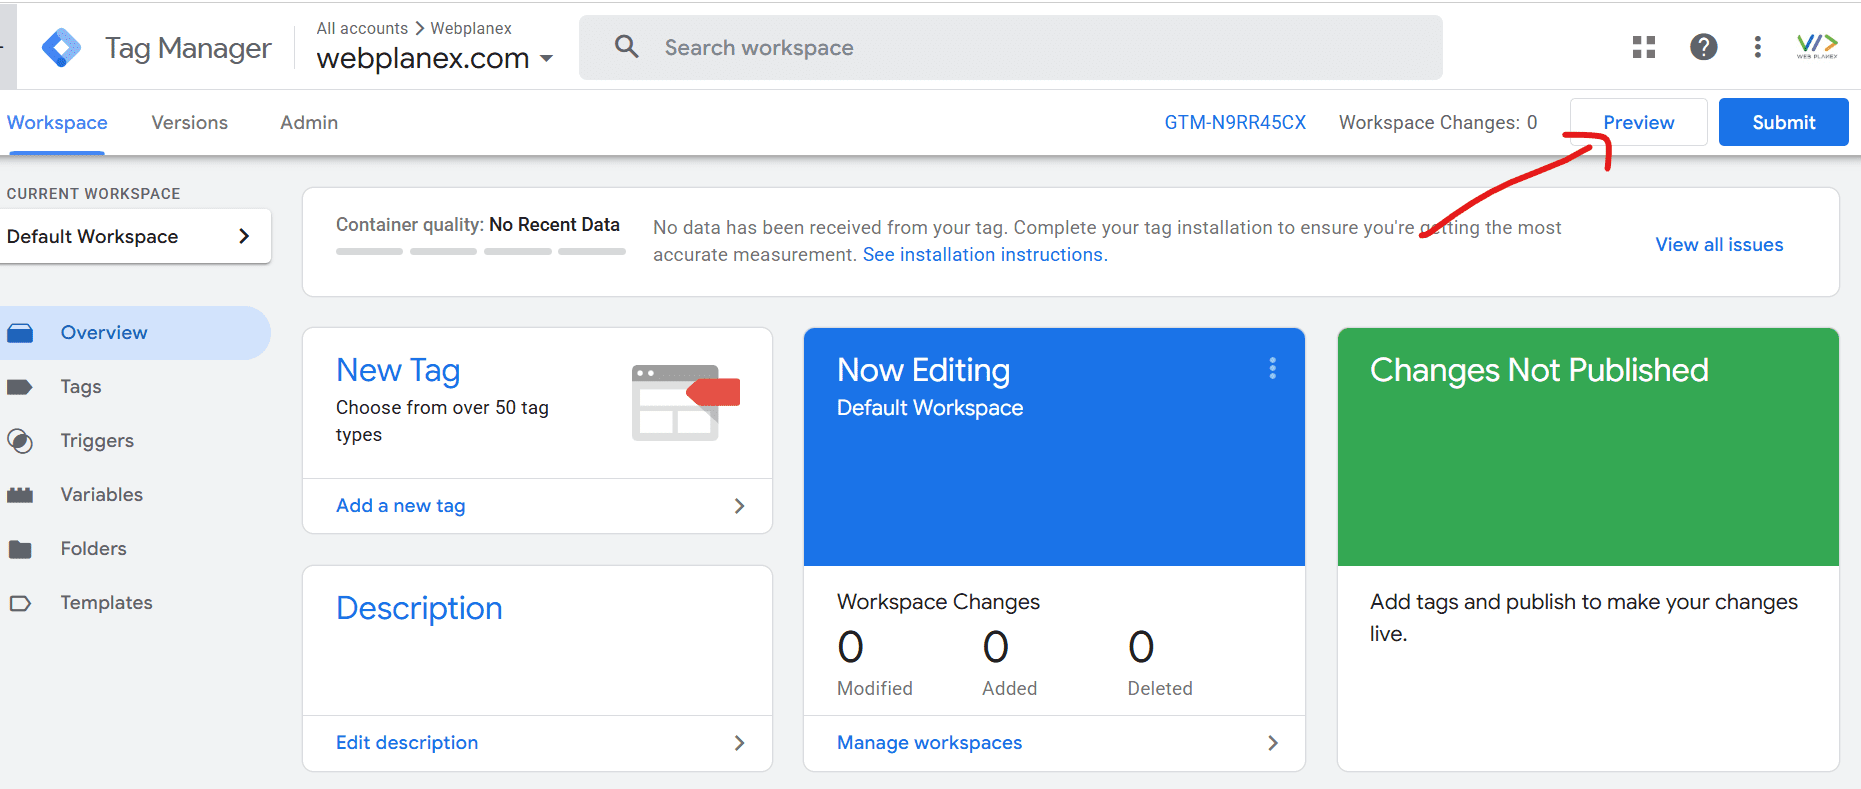
If everything was installed correctly, GTM should appear as “active”.
Step 7: Connect Google Analytics 4 (GA4)
Most Shopify stores connect GA4 through Google Tag Manager.
Inside GTM:
- Create a new tag
- Choose:
- Google Analytics: GA4 Configuration
- Add your Measurement ID
- Trigger: All Pages
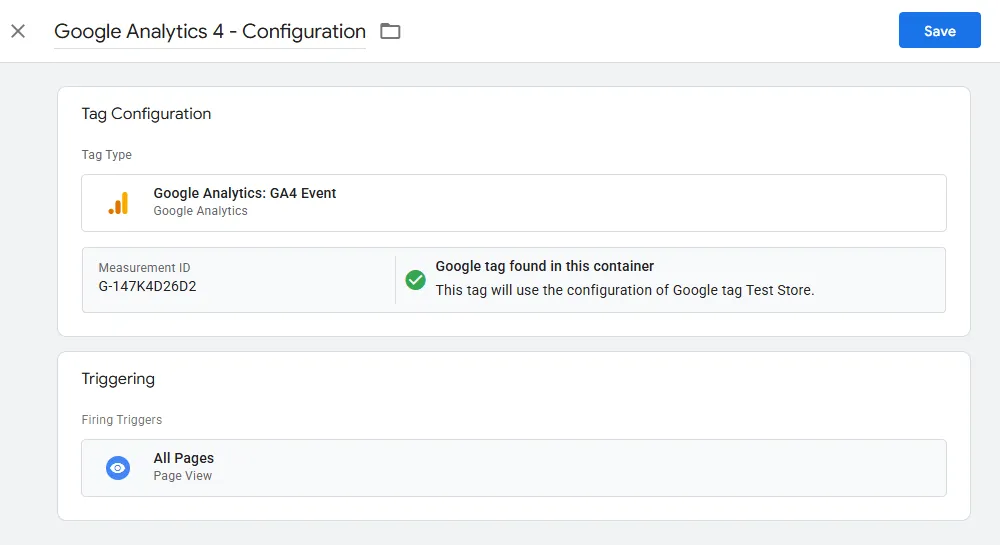
Publish the container
Done properly, this gives cleaner analytics tracking than older methods.
If you want to track Shopify app search terms in GA4 for better app marketing, we have covered the complete setup guide on tracking Shopify App Store search terms and app installs in GA4.
Step 8: Add Marketing Pixels
This is where Google Tag Manager becomes genuinely useful.
You can now manage:
- Meta Pixel
- Google Ads conversion tracking
- TikTok Pixel
- LinkedIn Insight Tag
- remarketing events
all from one place.
No constant theme editing.
No developer dependency every single time marketing wants a new event tracked.
Common Mistakes Shopify Stores Make
A few things regularly go wrong during setup.
Installing Multiple Tracking Codes
Sometimes stores:
- Install GA4 manually
- AND through GTM
- AND through an app
This creates duplicate data.
Always check what’s already installed before adding new tracking.
Forgetting Checkout Limitations
Standard Shopify plans have limited checkout customization access.
Some advanced ecommerce event tracking may require:
- Shopify Plus
- additional app integrations
- server-side tracking setups
Ignoring Site Speed
Too many scripts slow stores down.
This is where optimization tools become important. Many Shopify stores eventually use solutions like SpeedBooster to manage script loading and improve storefront performance after adding marketing tools and tracking scripts.
Because yes, tracking helps marketing, but excessive scripts can hurt speed if unmanaged.
Should You Use GTM in 2026?
If you:
- run ads
- care about analytics
- optimize conversions
- Use multiple marketing channels
Google Tag Manager becomes extremely useful very quickly, so a big yes. As it saves time, keeps tracking organized, and makes future marketing setups easier.
Conclusion
Adding Google Tag Manager to Shopify isn’t as complex as people expect it to be. Most of the work is just the setup phase. Once that’s done, managing tracking becomes far easier than manually editing theme files every few weeks.
And as ecommerce tracking becomes more important in 2026, having a structured setup matters more than ever.
Good tracking leads to better decisions. Better decisions usually lead to better conversions.
That’s really the point of all this.